
0
Owner's of the Craftmade Outdoor Ceiling Fan MOR54ESP3, MOR54MWW3 gave it a score of 0 out of 5. Here's how the scores stacked up:


page 5
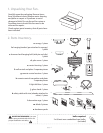
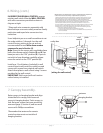
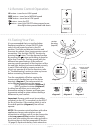
5. Fan Assembly. (cont.)
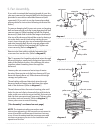
With the hanging bracket secured to the outlet box
and able to support the fan, you are now ready to
hang your fan. Grab the fan firmly with two hands.
Slide downrod through opening in hanging bracket
and let hanging ball rest on the hanging bracket.
Turn the hanging ball slot until it lines up with the
hanging bracket tab.
WARNING: Failure to align slot in hanging ball with
tab in hanging bracket may result in serious injury or
death.
Tip: Seek the help of another person to hold the
stepladder in place and to help lift the fan up to you
once you are set on the ladder.
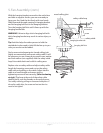
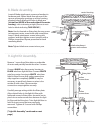
Find a secure attachment point (wood ceiling joist
highly recommended) and secure safety cable. It will
be necessary to use a heavy duty wood screw, washer
and lock washer (not supplied) with the safety cable
loop. Extra cable slack can be left in ceiling area.
Replace vice on safety cable and adjust safety cable
length by loosening screw and nut on the safety
cable vice and pulling on the cable. Adjust slack in
cable to a hands length and secure vice by
tightening screw and nut securely. [Refer to drawing
at right.] The loop at the end of the safety cable
should just fit over the threads on the wood screw.
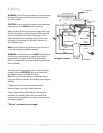
Test safety cable by pulling on loose end with pliers. If
the safety cable slips, the screw and nut on the vice
must be set tighter.
safety cable loop
wood ceiling joist
hanging ball slot
hanging bracket tab
safety cable
nut
screw
wood screw
and washer


Find Your Products By Category
Please Login
